Saturday, December 1, 2012

12-1-12

Well it bugs me every time I see it so the first thing I started doing today was bundling and trying to route and organize the mass of wiring my simple little vfr craft has accumulated in the past few weeks. To the right is a picture of how I left it last week and below is a picture how how it looked when I gave in again this time. Its a small improvement but an improvement none-the-less.
I thought about adding some annotations to the photo above but it seems pretty clear and it its not...
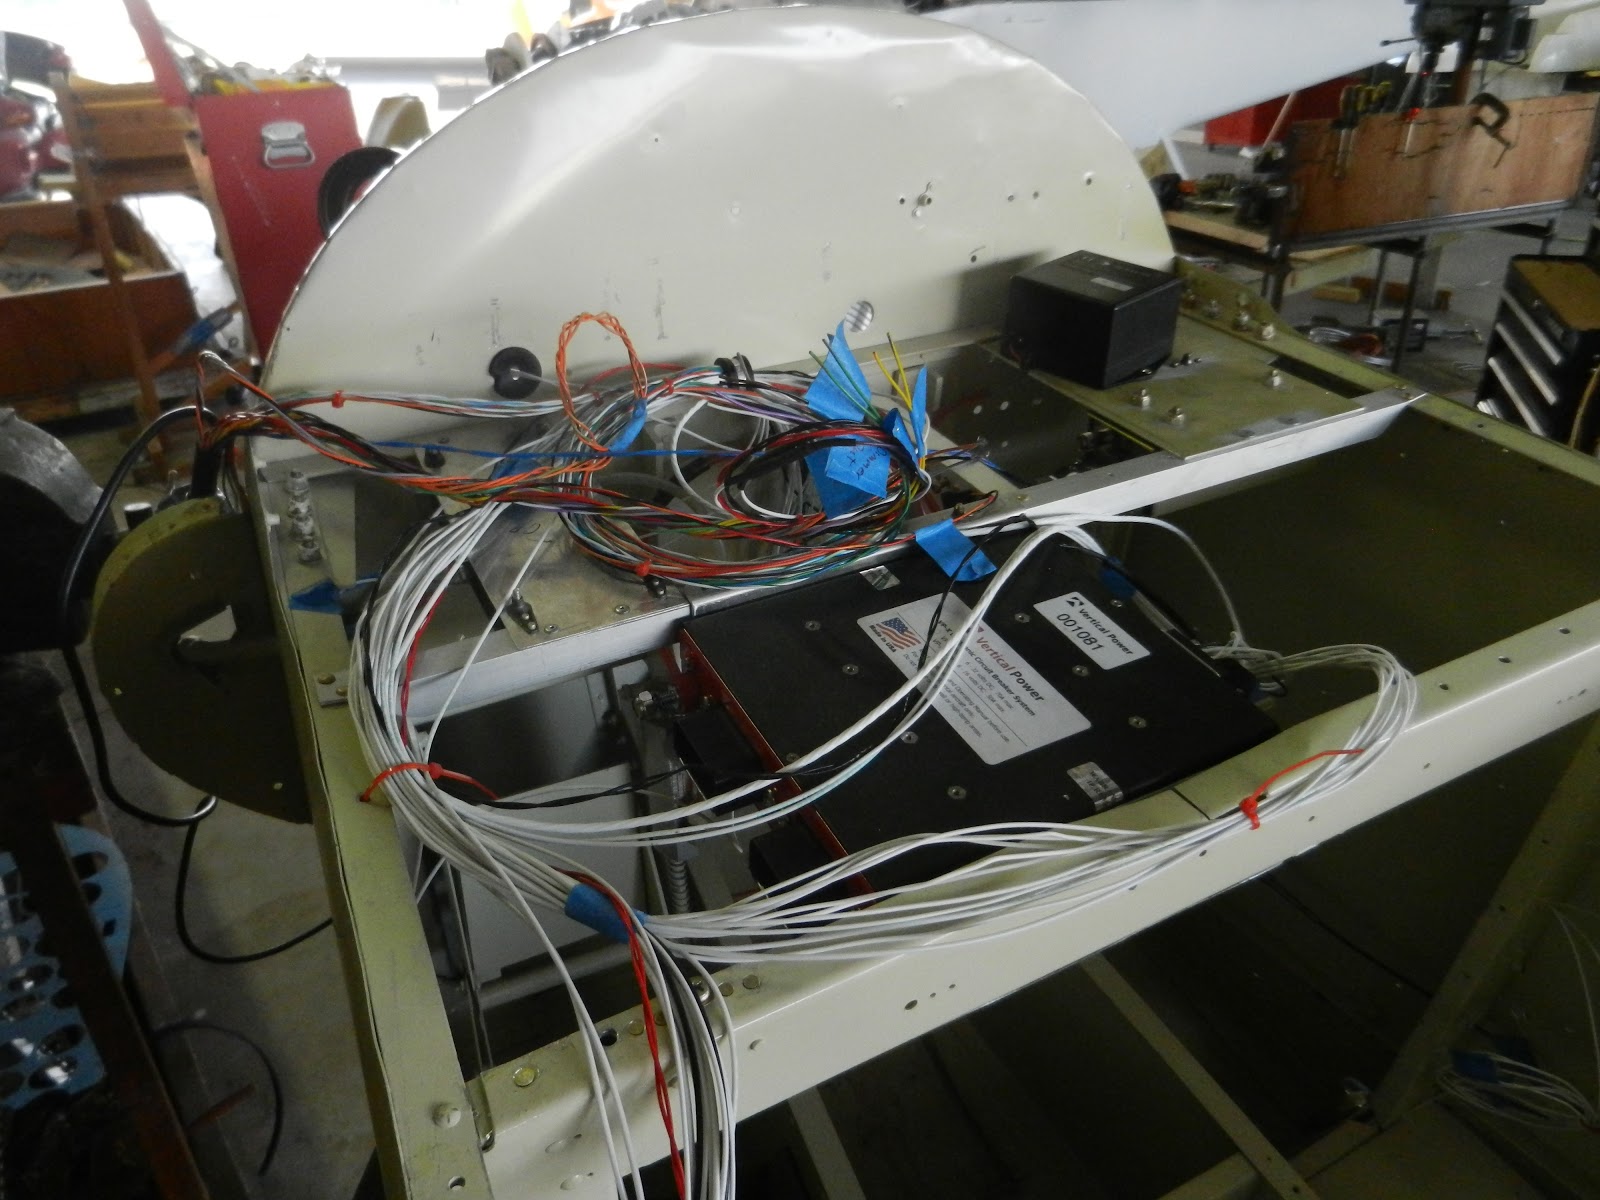
The red box is the Vp-x sport unit, directly to the left of that is the EMS module, to the rear of that is the grounding block and to the rear of that is the transponder and ontop the transponder mounting bracket is the backup Battery for the Efis. If you haven't been following along and wonder why everything is mounted upside down it is because I'm not sure that I will have overhead access to this area if I end up installing a slider canopy instead of the traditional tip-over.


I tried to fit a 10' Dynon and could have made it work but I guess ill save that as an upgrade to do sometime on down the line after she is flying. that 7" would work well for the GIB when I do.
On the right side sub-panel I have installed  a new FL 760 from Fliteline which I picked up from the VAF classifieds for less than new. Below that is the GT-50 G-meter/clock and to the right of the G-meter is a 12v outlet. To the immediate left of the Radio is a PS 1000II intercom that will double as my audio panel for now. I have pushed the SV7 over to allow for a 6 or 796 to have room to be installed in a gizo mount if desired. For now I think Ill just add a solid mount ram mount and use it to see if it works or is too close. I think I may prefer the Ram mount method as to allow easy changing of the viewing angle to alleviate glare in the bubble canopy.

Last thing I have cut into the panel are the switch housing for the Aveo Rockrack switches Im planning on putting in that location. Im looking to have a simple cockpit so on top will be a Battery Master and an Avionics Master. Below that will be the left and right mags. I like this location for the mags as I can reach them without even removing my had from the throttle during run-up. I have decided to to add the complexity of an Alternator switch as the only benefit I can see is being able to turn off that load while playing with the efis on the ground. In the rare occasion that I need this feature I will still be able to shut that circuit down through the Efis and VP-x on screen switching.

No key, the starter button is on the stick and is protected from accidental engagement by the VP-x


With the length of the over-sized down the length of the stick again to allow clearance for the Infinity grip and my hand. Once that was completed we re-installed the grip and the stick and I wired up the buttons. i would have like to have used an connector but I like being able to access all the terminals for troubleshooting too. Maybe ill convert to connectors of some kind after its all been flight tested and I'm looking for something to do. The fuel lines have mostly all been made and are all ready to be remade due to the fiasco last week with the fluting tool. Still to do is to add a nice ground to my grounding block terminal board and to ground the pump locally as well.


Just another close-up view of the right hand sub-panel with the radio and g-meter.


A very nice addition by dad is the hinged front center section lid just in front of the stick, A simple latch and Ill have another great place to store goodies forward of the CG. Dad also mounted the throttle to its bracket and I drilled out the holes for mounting the bracket after sitting in the seat, figuring the best height and location.     ..and making engine noises, yes. I am planning to create and install a different throttle handle that will house the Flap switch. Ive started messing with an ar-15 grip and a slim line rocker switch but its going to need some more refinement and will probably end up looking like some Mad Max hack job rather that some professional manufactured dew-hickey.


These photos were taken for the F1boss on the VAF forums. He said that he may be able to help out with my Slider change and asked me to take a few measurements. I'm sure he knows more that me and asked to see what a WB about four inches forward of the carry-through spar would look and feel like. Well here are some pictures of my makeshift WB in that location. Seems way too far aft for me. If that is where it HAS to be Ill make it a flopper.


Now one of these locations in the pictures to the right and below, even with the panel of just aft of it, seems like the right spot ergonomically and visually.


We had a nice surprise when we got back to Lakeland this weekend. Jay had prepped and painted both wings. ther are a few bad spots but its better than i could have done and he thinks we can sand and buff some of the orange peeling out. Regardless it is a huge improvement.


The end of another weekend but I think the end of this rebuild is coming into view finally after more thatn 2 years of weekends devoted to it. I was hoping that the end of the year would be it but I think its looking like Febrary before we are even close to flight testing. Dads trusty 172 waits patiently for us to finish paying all that attention to the -4 and focus our attention on her and the trip home again.

Before leaving we disassembled the tail and set all the feathers and stabilizers out to be prepped and painted during the week. We will see next weekend how they turned out.

Saturday, November 24, 2012

11-24-12


I was planning on using the new tail I had bought in its entirety but there really inst anything wrong with the vertical and horizontal stabilizers so I fit the old stabilizers back on. With he addition of the fastback it was necessary to shave off a portion of the the vertical stabilizer shown here. I could stand to shave some more off.


The uncut panel is installed but I really don't like the gaps I ended up with. I'm sure I'm going to end up redoing the whole thing but for now I'm going to press on to things I haven't messed up yet.


Dad made this bracket to install the throttle onto. It still needs to be drilled and mounted into its final location.


I made the surround panel for the stick and had a few things left to do to it. Dad picked up where I left off and when it was almost complete he drilled a hole in the wrong corner. We discussed installing something there to cover the hole but decided to just remake the piece instead. When I took the picture below I wasn't sure if we would make a new one so i framed the hole out of the picture.


...And one final shot of the the tail dry-fitted before leaving for the day.

Sunday, November 18, 2012

Wiring and A/P Servo Installation


Mounted the back-up battery for the Skyview system. Used the same plate that the transponder is on.


I added some temporary labels to keep the wiring straight on the terminal strip in the left passenger footwell. This will be covered by the the footwell inserts. Once the wings are mounted I can hook the wing wiring up here.


The Flap Position sensor (pos-12) is taped tothe area where it will be needed along with plenty of extra wire. The flap motor will be mounted on the rear of the triangle brace and operate the flp arm below it from a switch on the throttle. Ill will need to pick up a small clevis joint and rod from the hobby store to operate the sensor.


Dad worked on assembling and installing the aileron servo for the auto pilot. He widened out the hole in the longeron where the aileron push-tube passes through and connects. We are holding off on mounting it to the floor until we can remount the right wing and check for clearance of the push-tube.


While he worked on the aileron servo i worked on the bellcrank and the brackets for the pitch a/p servo. I took out the old bellcrank brackets and match-drilled the new brackets per the instructions and re-installed the bracket. Removed the bellcrank and drilled the hole for the arm of the servo rod to attach again per the instructions. Reassembled everything and stuffed the wires away to be hooked up later.


I attached the OAT sensor here are the last turtle-deck bulkhead not realizing that it will interfere with the tail be mounted and will have to be removed and relocated. Not before I secure all the wires with some ingenious methods -that made it even harder to relocate.

We pulled some slack out of the main harness going to the ADHARS, enough to connect the servo and still had enough to retain service loops where I wanted them.


I guess I was supposed to buy the Dynon connecter harness that has 5 connectors and makes nice and neat way to add or remove/change components but I just spliced into the ADHARS lines and ran a separate power and ground. Per the Dynon instructions each servo gets its own circuit and I will ground them locally. the yellow wire  goes to the A/P disconnect on the Infinity grip. (black button half way down)

Trying to keep the wiring organized and for as simple as this set-up is I still manged to get a plate full of spaghetti. Ill see if I cant clean this up before its buttoned up and called done.


One last look at the slow motion resurrection of this RV-4 before we load up and fly home.


Home again after a hard days work. Beautiful sunset on the Peace River as we approached PGD to hanger it up until next weekend. Thanks for all your help, love and support Dad. 


Tuesday, October 16, 2012

VP-X

Vertical Power's VP-X...

...Mounted


I arrived at South Lakeland a bit later than normal and had just got the 172 tied down when the group of RV-4's I had seen parked over by the T-hangers, started up their motors and taxied onto the runway. I was hoping to get a closer look at these pilots birds but no dice.


 I watched as they took off in groups of two and then went back to unloading my cooler and heading over to the corner store for a bottle (glass) of coke. Jay was there when I returned and said that he was trying to source a new tail for my -4 and that those guys were down from Jacksonville and may have known about one.


It turns out that after getting the old tail feathers primed it was pretty evident just how rough they were. i was contemplating updating the tail anyway to get the newer thinker skins but have read that if instlled correctly the thin skins can do just fine. ...and be lighter in the end too. (No pun intended). I looked into installing an -8 tail and even talked briefly to a guy who had done just that to his -4. The differneces being that he had an IO-360 and C/S prop to balance out the added weight. I have an 0-320 and a light weight 3-blade Catto prop so that sounded pretty iffy. I then found out that the difference in weight is a whopping 9lbs so that killed that idea. Back to looking for a -4 emp.


 Jay had been pretty busy it appears during the week while I was away. He had the tail all primed up as I mentioned above but he had also primed the rest of the fuselage and the wings too. It is very nice to see some progress that I didn't have to do and appreciate his efforts immensely. It was ready for prime, i had bee sanding and prepping on the wings, tail and fuselage every time I wasn't sure what to do next and hadn't really run out of prep items to do but had run out of patience doing them. So I'm really happy to have it primed now.


 With y mock panel in place and my paper cutouts providing some bit of inspiration I set about making the bracket and installing the VP-X. Its going to be a pretty basic panel in that I have a bit of room to work with being such a small area to work in if that makes sense to anyone but me..


 I thought about it and decided to put it pretty much in the middle. That should provide the most space for the harnesses that enter on both sides of the unit.Those Ethernet ports are not going to be easy to get to so I may end up installing an extension and a port in the panel along with some usb ports for the Dynon SV and maybe an audi in port or something.

 I wanted to be able to take it out easily from the bottom since I'm still planning on making this thing a slider canopy and have not worked out top access to the area behind the panel yet and I'm not sure It will be feasible to do. I installed the cross brace and some nut plates. I made a bracket for each side of the unit and installed them in such a manner that it would be a straight shot for the screwdriver. The brackets being the way there are will hopefully keep the unit from falling on my face upon removal in the future.


 As seems to be the norm this time of year, the afternoon storms threatening reminded us that we needed to get going on home.

 We diverted slightly around a few more cells and had mostly clear skies by the time we neared home.

Monday, August 20, 2012

Prime time

On a right down wind for runway 14 at South Lakeland, arriving to chip at away at this resto...


When I got to the plane and started looking over what had been done so far I noticed this helpful little note of instruction penned on my new turtle deck. It says "Take the Whitney Punch and punch out slugs .030 thick, then to use the Mushroom set to drive the slug into my miss-drilled holes; like a rivet.

So the next time the skin came off we did just that and it worked perfectly. Next time Ill still be more carefull drilling. These holes resulted from my back drilling the hold to diverge from the line.


I forgot to mention that last weekend we did get a few things. I have been cleaning out the interior as we have gone along and had it to a point that I was ready to put some paint down on it. Im sure there were better methods but I cleaned all the adhesive off the inside wiped it down, prepped it , masked it and sprayed it with about 3 rattle cans of "Appliance Paint" in Almond color. After having let it cure up during the week I found that it had set up nice and hard. It passed the fingernail test, so Im pleased and Ill be able to touch it up anywhere there is a wolly-world.
As I mentioned before I'm going to relocate the radios to the right hand side if I can work out the clearances.


This is a little rendering I taped up to signal to Jay that painting the damn thing Yellow what not on my mind. I really would like to paint it flat black but have been talked out of that due to the way it will show fluid stains, forever. So then I still think a semi-gloss black or even full gloss would be good. I understand that with black fuel tanks I may need to not fill them up all the way. Or maybe no more then half if it will be on the ramp for any amount of time, but I'd like to keep it hangered of course. I do not think that it would be any hotter than any other color other than white. As a second choice I like the scheme below. I am partial to the Rockets that are sporting camo schemes, but dont care for the p-51 look; I like the actual camo schemes. Still thinking about it all. Jay said earlier that he wanted a line of demarcation so that we could paint the bottom and then the top and if I picked a solid color I would have a line... Not  sure ho other people have done it then... He is also pretty intent on the fact that I would have to buy him a gun for each and every color I may want other than yellow and white. Im not sure at this point if he is serious or still just antagonizing me about the colors.


I pulled the clecos out of one side and across the top so that I could drill and add some more rivets to the old/new bulkhead joint.


While it was still opened up on one side and since we already had the underside primed we started pounding the rivets that were accessible.
I did the grunt work and Jay and I worked out our communication and got our method down before closing it up and having me crawl inside the tunnel of boom.
I really think I got the short end when it came time to pick jobs.
The first row looks great so its on tho the rest of them now.

Although it may look like I am giving my fuselage a giant hug, It is just where I grabbed it to wheel it out of the hanger for a coat of primer on the turtle deck.


Before

A little pride in ownership pose...
It is pretty clear in this picture that when the guys on VAF say "loose some weight" or "go on a diet" as the best solution for any number of given issues, it simply inst going to work for me...


After (and out of focus)